Rooms and Areas is a management feature that allows you to set up a LOCATION (such as a building or pool areas) and define AREAS (classrooms or cabanas) contained in them. You can then assign them to products such as birthdays, cabanas, programs as well as reserve spaces or utilities that are shared by staff while avoiding any possibility of overbooking a room/area.
After reading all parts of this series of articles, you should have the tools to guide you through the creation of location, room/area creation, assignment of rooms to certain product types and for adhoc booking.
| Creating a Location | Screenshots |
| 1. Visit “Rooms and Areas” located in the left-hand navigation under “Products and Settings |  |
| 2. Click the button “Add New Location”. Locations is a grouping of Areas. Some examples include, "Cabanas", "Party Rooms", etc. |  |
| 3. Add a Location Name, Venue (If applicable),Start and End Date, Description of location, and enable active. When ready, click on the 'Submit' button. |
|
| Creating an Area | Screenshots |
| 1. Select “Add New AREA to Reserve” |  |
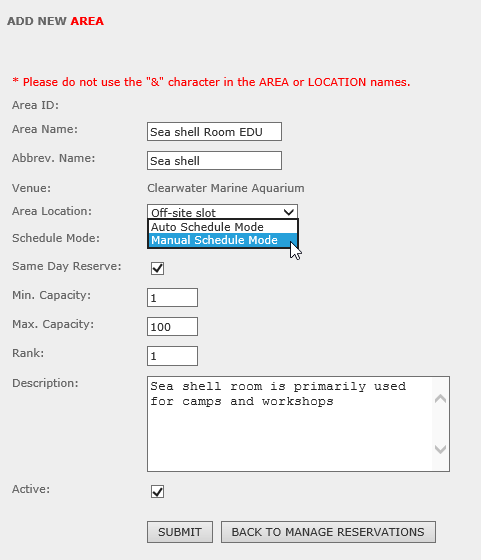
2. Fill out and check the following fields:
- Area Name
- Abbreviated Area name
- Venue (if Applicable)
- Area Location(*)
- Schedule (*)mode,
- Same Day Reserve
- Min/Max(*) capacity
- Rank (*)
- Description of the Area
- Active and submit the button.
Auto schedule Mode is used for class registration and room scheduler products.
Manual Schedule Mode is used for products such as Registration (Event-control only), Cabanas and ADHOC reservations only.
*Same Day Reserve allows a room to be booked on the day of the event.
*Ranking of a room only applies to Auto schedule mode. This allows rooms to be reserved by rank. Meaning if you have five rooms, the room ranked as “1” would be picked first unless the capacity defined does not work for the program being booked. In that case it would move to the next ranked room that has the appropriate capacity.
|
 |

