| Steps | Screenshots |
Navigating to the Package Setup
Step 1:
Go to your ticketing website and type /management at the end of the URL. Then press enter.
|
|
Step 2:
Log in to the management dashboard.
|
|
Step 3:
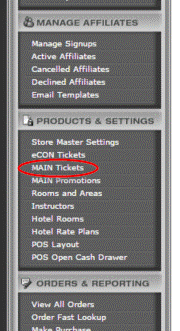
Click on MAIN Tickets under Products & Settings.
|  |
Step 4:
Select a Category that you have already created. If you have not created a category yet, refer to the Quick Reference Guide on how to create a category.
|
|
Step 5:
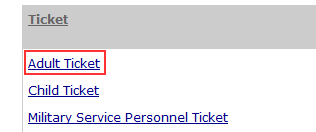
Select the ticket that you would like to add a package to.
|
 |
Step 6: |
Click the ‘Click here to define package detail’ link. It is about three-quarters of the way down the page.
|
|
|
Setting up the Package
Step 1:
|
In the dropdown box for ‘Include a Package?’, select yes and whether you want the items to be add for an additional charge or not.
|
|
|
Step 2:
| Select the product that you want include from the ‘PRODUCT’ dropdown menu. |
 |
Step 3:
|
Click the submit button.
|
|
|
Step 4: |
If there is a session for the product select a session and click submit.
|
|
|
Step 5:
Repeat steps 1-4 to add additional item to your package
|

